Rebuilding Scotty Electrics
Last Updated:
7/10/2007
Many of you have had questions about the electrical
wiring.
Here is how I did it. Your mileage may very.
Although I have an AAS degree in Electrical
Technology, I am NOT a certified electrician.
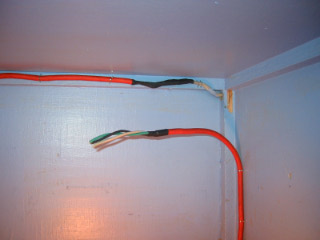
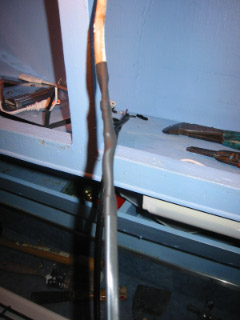
Here
is where the AC wiring goes up in and over the ceiling
to the cabinet above the sink.
Shown is the wire up top, near the ceiling. This wire
is only a two conductor wire. Its stranded wire, just
like the orange extension cord wires, it is NOT solid core
wire as youwill find in most
house wiring. This does not mean its unsafe, its the
same stuff used in extension cords. And because its
stranded, it does not fit around the screws on normal
electrical outlets very well. But being that it is only two
wires, it does mean you won't have a ground.
Which for safety reasons, most electrical codes
require. But if you have only a TV or
Cell Phone charger or any other two prong AC power
plug, then it should work just fine and be as safe as
any other two-wire extension cord. Just don't plug a
heater into it or an A/C unit!! The size of the wire
will not handle the load. How I splice the
orange cord into the Scotty white cord is shown later.
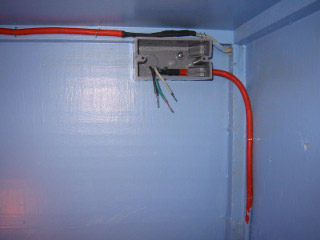
Here
is how I install electrical outlets. I use orange 14
gauge extension cord wire which runs back to a 15 amp
breaker on the circuit beaker box. I then place
an inch of shrink tubing on the end (the black stuff) where
I stripped back the orange plastic. Then I tin the
wire tips (place some solder on them)

This
is the type of outlet I use. It has slots to hold the wire,
rather than just wrapping the wire around the screw as with
normal outlets. This will hold the wire tighter,
because the wire is not solid as normal house wiring
is. Although when I tin the wire, it will help make
it solid, but its still not exactly the way house wiring
is.
Loose wires create heat and heat creates fire and fire
burns down Scotties!!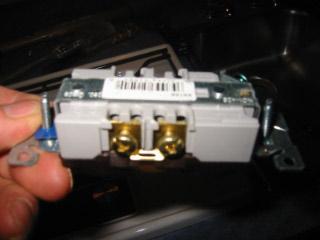
I
then connect the Black wires (hot) to the Brass colored
screws (shown above), the white wires (neutral) to the
Silver colored screws and the green wires (ground) to the
green colored screw. Since there is only one green
screw. I needed to twist together all the green wires,
solder them together, place a wire nut over it all, then
attach another green wire from this junction to the
green screw on the outlet. Sorry no picture of
this.
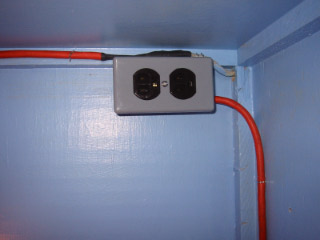
Here
it is all put together. This outlet will, eventually,
be used for my A/C unit which will hopefully fit in this
cabinet opening. The wire runs back to the breaker
box with out going any place else.

This
is how I join two wires together. This is the wire out of
the ceiling in the cabinetover the
sink. The other end of the wire will connect to an
outlet box, and then the lights over the sink will run
into the box. I first twist the
wires together.
Do NOT use
Rattail
joints use
Western
Union joints as show.
Then I solder the two wires together.
As
with the color coding on all the other wires in the Scotty,
these wires are no exception, so instead of Black &
White, these are Red & White/Red. The
red wire (from the ceiling) connects to the black wire
(going to the outlet box) and the
white/redwire (from the
ceiling) connects to the white wire (going to the
outlet box).

Then
I place shrink
tubing around each wire.
Then
I place a large piece of shrink tubing around the
entire piece of wire. Now its just as good as
new!!
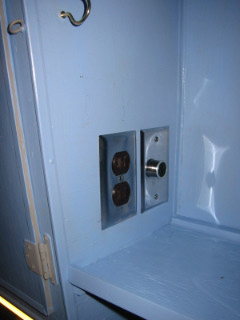
Here
is the back of the outlet setup over the kitchen
sink. The white wire goes from the outlet to the 110V
AC light over the sink, the black wire is from the line
running over the ceiling that we just spliced together
above, and the other larger and thicker black wire is for
the 12V DC lighter outlet, it also comes from over the
ceiling, but it also goes to the 12V DC light over the
table, 12V light over the sink and 12V fan in the vent over
the stove. The orange is a ty-wrap working as a
strain relief for the cable going to the 12 volt
outlet. The cables are stapled in using a cable
staple gun purchased from Home Depot.
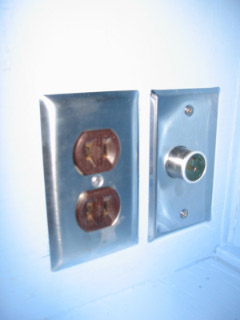
Picture of front
of outlets. For this particular setup, since it only
has two wires and no ground had to use a two conductor 110V
outlet. Hard to find unless you have a house over 50
years old.
Better view of
the outlet.
Last Updated:
07/05/2006
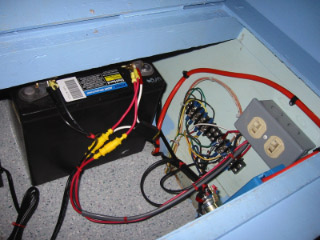
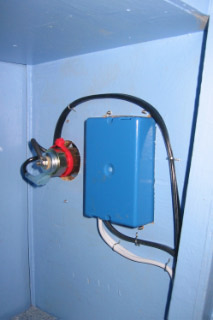
Sears
Deep-Cycle 22NF 50AH Sealed Wheel
Chair BatteryThis battery can
be placed on the inside of trailerbecause it is
sealed and does not need venting.Switch #1 on
right controls house lights & vent fan
power.Switch #2 on
right controls 12V outlets and fridge
powerand the 12V water
pump.Terminal Strip is
where connection for trailer brakes,trailer lights
and tow vehicle power are made.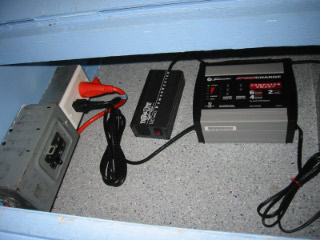
Grey
box on left is a Circuit breaker box with one15A
breakerfor lights and
outlets and a 20A breaker for microwave, fridge &
A/C.Duplex outlet
w/white cover is a Ground-Fault
Interrupter.Orange cord
connects to the lights and outlets in
camper.Black cord
connects to processor controlled battery
charger.Black box next to
charger converts 12Volts to 110Volts.Orange cord can
be plugged into 110V inverter when shore power is
off.The will never be
a way to plug microwave, fridge and
A/C into 12V to 110V
converter.
Breaker #1
connects to Ground Fault Interrupter
outlet.Breaker #2
connects to Refrigerator, Microwave and A/C.
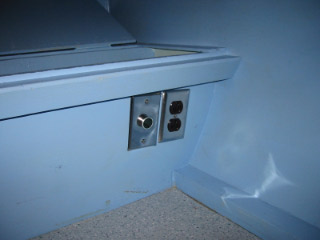
110V
outlets and 12V outlets are mounted in
pairs.Where ever there
is a 12V outlet, there is also a 110V outlet.
(12V on left 110V on right).Outlets pictured
are located under the dinette table.Link
to electrical information.
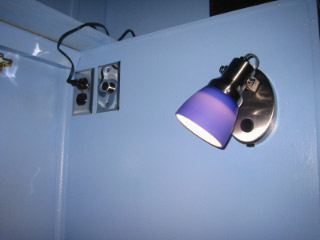
110V
and 12V outlets next to the 110V lamp
are located on the
wall to the left of refrigerator. The lamp was
found for sale at a Lowes lumber store.
Page Last
Updated: Friday, June 16, 2006